Here's the trailer for the film in the form of the first shots . . . now just the rest to make :)

Wednesday, 22 August 2012
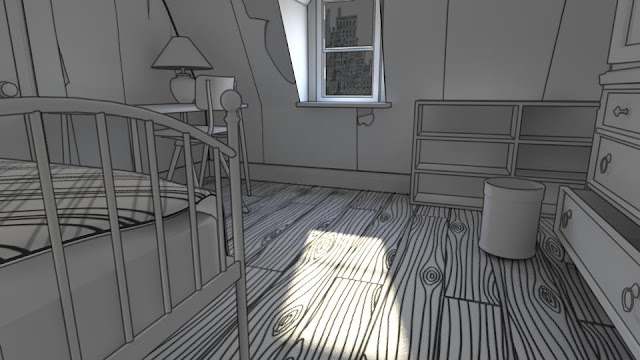
Environment: final look
Here are some stills showing the textured environment with contour outlines comped on and integrated with background artwork from David Fleck


Friday, 10 August 2012
LRC - some images from my comped shots
An update on lighting, rendering and compositing . . . here are some stills from my comps:


Saturday, 4 August 2012
Lighting: Lighting Sandbox, nighttime scene
Some early tests for the lighting in my night time shots . . .
. . . and here's what you tube had to say about my lighting skills!

. . . and here's what you tube had to say about my lighting skills!

Friday, 3 August 2012
Photon Colour
This is not so much a tech tip as a tech question. I've found that with one point light and one area light in my scene if I set them both to emit photons I can't get them to emit photons of different colours.
They either default back to white, or back to the colour that I set for the first light.
In the attribute editor I'm able to edit the colour and it looks as though it's changed - but the next time I go into the AO for the relevant light the colour has defaulted back to one of the scenarios described above.
Either I'm missing something really obvious or it's a bug in maya so if anyone has any answers please let me know.
Thursday, 2 August 2012
Tech Tips: frame offset with mental ray mv2DToxik pass
I've been having all sorts of problems whereby passes from any render layers which aren't my "main" layer (in this case AO and mattes) didn't line up with the passes from my main layer. They appeared to have a temporal offset of a fraction of a frame.
I've read a few forum threads and this is what I think was happening . . .
In order to calculate vector information the motion vector pass renders with a 1/2 frame shutter offset (I think it's 1/2 a frame but don't quote me on that - I'm going to read up on the maths behind this when I have more time). All the other passes in that layer are rendered with the same offset (in my case that was beauty, spec, reflection, shadow etc etc). However, any layers without an MV pass associated still render on whole frames (my AO and matte passes). Hence the offset in my comp!
The solution:
Number 1:
In render globals under the Quality Tab turn on Motion Blur
(temporarily). Go to the "Motion Offsets" tab. Check "Custom Motion
Offsets" ON. From there set the "Motion Back Offset" to 0.00. Finally,
just turn off Motion Blur. This disables the 1/2 frame offset on any layers with the mv2d render
pass.
Number 2:
Under the Options Tab, expand the "Mental Ray Overrides" tab. Scroll down to the "Performance" Tab. If you check "Force Motion Vector Computation" ON, it forces that offset on all your render layers, even if you don't have that mv2d pass associated with that render layer.
Thanks to the following for helping me figure this one out:
Wednesday, 1 August 2012
Comping: sample Nuke script
Now that I've finally fixed my rendering problems and have some frames to play with I'm LOVING using Nuke.
With less than two weeks to learn Nuke from scratch and comp my shots I've (obviously) barely scratched the surface, but it's clearly a genius software (and whoever thought of the tab function deserves a knighthood, or at least a pint).
Really all I've had time for in Nuke is to realise how much functionality there is which I'm not going to get my head around in time for my masters hand-in ;) but below is a sample script from one of my shots which has the basics (grades, colour correction, depth, DoF, motion blur etc) plus a few dust particles, god rays and a contour line overlay for good measure.

Saturday, 28 July 2012
Ahhhh - don't combine referencing and rendering in maya . . .
So having done lots of lighting tests, played with GI and Final Gather settings days to optimise render times etc etc I've now just spent the best part of two week not rendering a single frame!
My scene has been behaving really strangely. Amongst other things lighting updates weren't rippling through from my referenced files, materials were mysteriously falling off assets and after painstakingly setting up render layers I was then getting locked out of them with error messages about missing nodes.
However, I finally know what was causing the problem. Maya's not very robust when it comes to combining referencing and render layers. After much googling I came across this post - appropriately titled "why your render layers break" which was an absolute saviour
http://www.toadstorm.com/blog/?p=26
Because the problems I was encountering were so various I didn't realise at first that they had a common source. Great to know what the problem is now though.
Fortunately my project is simple enough that I can just import the environments and rigs into my anim scenes, redo the lighting in situ, and use this as my final render scene.
Gah, why is it that I hit my worst technical problem so close to the final deadline? :)
Wednesday, 25 July 2012
Lighting & Rendering: more lighting / rendering tests
A few more images from my room environment. The lighting's OKish, however I'm struggling to keep render times manageable. The main culprit is the sampling value which needs to be a a minimum of 16 to avoid grainy shadows, at which point the render times leap up. (NB the images below have a lower filter setting as they're tests rather than final renders:


Saturday, 21 July 2012

Tuesday, 17 July 2012
Writer Textures: Wood Grain
and here are the 3D textures inspired by the 2D research in my last post:


Saturday, 14 July 2012
Writer Wood Textures
I've been playing around with some different wood grain and colour so that I've got a decent reference when I make the final tweaks to the existing wood grain texture that I'm using for the Writer character - here are the front runners so far:


Friday, 13 July 2012
Comping: Contour Test
And here's a test of adding in outlines which were generated using mental ray contour shaders . . .

Wednesday, 11 July 2012
Lighting and Rendering: Lighting Tests
Here are some tests for the daytime lighting of the writerRoom environment.
There's still a lot to do: some banding on the walls, grainy edges to the window shadow on the floor, some jaggy edges (sighs).
However, the overall look is getting there.
In general there are so many different approaches that one could take to lighting any given scene that as a beginner l feel a bit like I'm groping in the dark (sorry for the pun!) I wish I had months to explore lighting but I'm going to have to make a choice of approach and stick with it so that I can move on with the project.
This particular scene was lit using physical sun and sky with a spotlight portal light in the window and Global Illumination and Final Gather enabled. I've upped the haze value on the physical sky shader to 1 to warm up the light a bit as it was originally too blue. At the moment raytrace shadows are enabled. Next up I'll experiment with depth map shadows to see what results I get and how it affects render times and will also look at tweaking GI, FG & shadow settings with the hope of improving quality and / or bringing down render times.
Render times are currently just under 3 1/2 minutes. Here are the images. Any comments would be very welcome :)


Tuesday, 10 July 2012
Modelling: final Margarita model
Here's the finished model for Margarita along with some scanned book pages that I'll use for texturing:


Wednesday, 4 July 2012
Tech Tips: Render Progress Messages
Gah - why does maya offer you options that don't work?!
I spent ages trying to set the Render Verbosity to "Progress Messages" through the mentalrayGlobals tab in the attribute editor, but it just kept reverting to "Warning Messages" every time I hit render.
It turns out that in the menubar you need to go to Render -> Render Current Frame and click the option box next to that. It seems that the settings here override the ones in mentalrayGlobals.
Here's the forum where I found this lifesaver: http://area.autodesk.com/forum/autodesk-maya/lighting---rendering/render-verbosity-wont-stay-on-progress-messages/
Tuesday, 3 July 2012

Monday, 2 July 2012
Modelling - Margarita Head
Phew, at last I feel as though I'm getting somewhere with modelling Margarita's head. The model has been about 80% complete for weeks and weeks now but I just couldn't seem to get my head around how to model the head with the right contours and "seams" to make it looks as though she could realistically be made from paper, but at last I think I'm beginning to crack it :)

Now I'm looking forward to modelling her hair: can you remember as a kid making paper curls by running the blade of some scissors along a strip of paper? Well, that's the plan for the hair :)

Now I'm looking forward to modelling her hair: can you remember as a kid making paper curls by running the blade of some scissors along a strip of paper? Well, that's the plan for the hair :)
Tuesday, 19 June 2012
Tech Tips: maya move pivot mac
Whenever I switch to a mac I seem to forget how to move a pivot in maya so here's a reminder for myself . . .
d OR fn left arrow both do it :)
d OR fn left arrow both do it :)
Tech Tips: Global Illum Photons Greyed Out?
Gah, maya is so buggy . . . but this just saved me :)
http://forums.creativecow.net/thread/61/858115
Thanks Francois :)
http://forums.creativecow.net/thread/61/858115
Thanks Francois :)
Wednesday, 13 June 2012
Layout - initial shots
3D layout is coming on well. Lots of the shots sill need work but here's the opening sequence. More shots to come as I fix uncooperative cameras and gimbal-lock-induced cerebral palsy in my character!
Sunday, 10 June 2012
ZBrush - hide lightbox
Every time I've been away from ZBrush for a while I seem to forget how to toggle the lightbox along the bottom on and off . . . . "," does the trick :)
Friday, 25 May 2012
Rigging: Blendshapes
Here's a quick preview of the blendshapes that I've made for my rig. By combining two or more in animation I can get a pretty good range and variety of expression :)
Tuesday, 22 May 2012

Monday, 21 May 2012
Animation: video ref
Brian and Rudy very kindly helped me to shot some reference footage as an anim guide - here are some of the shots:
Friday, 11 May 2012
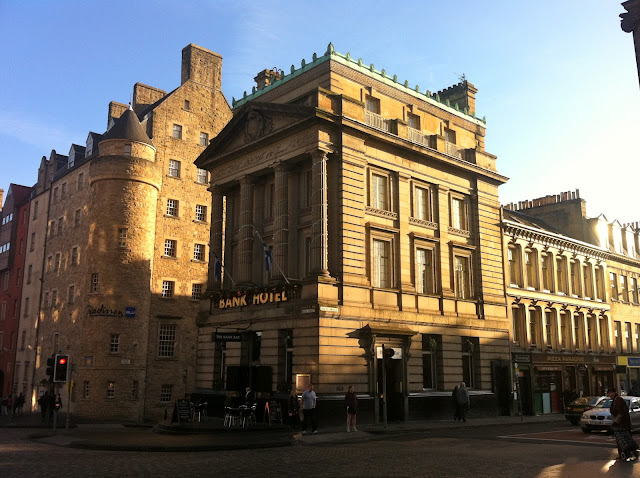
Environment Design: perfect reference
Thanks to Garry (http://garrywhittonanimator.wordpress.com/) I now have some perfect ref for my environments.
He was walking through Edinburgh, saw these in a gallery window and immediately thought of my project, and he's right - they're exactly the look that I'm going for. Thanks Garry! :D
The gallery is the Red Door Gallery (it's a lovely place, make sure you pop in if you're ever in Edinburgh) and the artist is the very talented Mr David Fleck: http://fleck-tesseract.tumblr.com/


Wednesday, 9 May 2012
Mia_x layered shaders
I've just mastered layered shaders using mia_x materials. Tons of forum posts said it wasn't possible then I found this genius tutorial:
http://www.youtube.com/watch?v=4uRx3ID5oMY
(NB remember to check the 'alpha is luminance' box on the texture that you're using as an alpha - for some reason that's the step I always forget to do)
I'm loath to share this image as there's SO much work still to do to get it to look right, but using layered shaders enabled me to get a wood shader onto the hands and a separate graphite shader onto the 'nails'.

Monday, 7 May 2012

Wood Texture Tutorial
This tutorial has been an invaluable starting point in trying to get a wood texture working for my main character::)
http://www.pixelophy.com/?p=105
Saturday, 5 May 2012
Look Development: Contour Rendering
I'm hoping to create a 'drawn' look for my environments by combining contour renders with illustrative textures. Here's my first attempt at rendering contours - it needs a lot of tweaking but. having done this quick test, I'm now confident that it's going to work eventually :)

Friday, 4 May 2012
Rigging: blend shape sketches
Brian Lindsay (http://www.yodasportrait.blogspot.co.uk/) very kindly did me some sketches as reference for modelling blend shapes - thanks Brian!


Wednesday, 2 May 2012
Sunday, 29 April 2012

High Quality Rendering
Huzzah, finally found the High Quality Rendering option. I'd used it before to make sure that the textures in my viewport weren't all fuzzy but then forgot where to find it! So here's a reminder to myself for next time.


Saturday, 28 April 2012
Transferring UVs after rigging
I haven't actually had to use this workflow yet - but stumbled across it whilst trying to find an answer to another rigging problem and I have the feeling that it may come in really useful one day so I'm adding it to my technical tips list!
http://gabnation.wordpress.com/2010/02/09/how-to-transfer-uvs-after-rigging/
http://gabnation.wordpress.com/2010/02/09/how-to-transfer-uvs-after-rigging/
Friday, 27 April 2012
Environments: Modelling
And here are some WIP images of the environment model inspired by Sarah's original sketch:


Thursday, 26 April 2012
Margarita: early stage modelling
Here are some images of my early modelling on Margarita: there's lots still to do (changes to her face, shrinking her enormous feet!, adding arms, hair etc.) but here's the progress so far . . .


Sunday, 22 April 2012
Maya UVing workflow
I've spent a lot of time on various forums recently looking at ways to reduce the pain of UVing.
The only thing that everyone seems to agree on is that it's a very dull job :) but I've combined the advice from a couple of blogs and forum threads to come up with a workflow that's working OK for me at the moment and seems reasonably efficient . . . .
Check out the following sites for the original sources for these tips:
http://www.tokeru.com/t/bin/view/Maya/MayaModelling
http://arcan3artist.blogspot.co.uk/2008/02/well-maya.html
The only thing that everyone seems to agree on is that it's a very dull job :) but I've combined the advice from a couple of blogs and forum threads to come up with a workflow that's working OK for me at the moment and seems reasonably efficient . . . .
- run an auto-uv to get a bunch of flat uv's
- select all uv's, split uv edges
- select the edges where you want the seam to be, then shift-drag over the whole mesh to invert your selection
- run 'move and sew' to re-attach all your uv's, apart from your seams
- run unfold with the following settings:
- Weight Solver towards: 0.45 to 0.7
- Optimize to Original:0.25 to 0.5
- Pin UV Border: Off
- Pin UVs: Off
- Unfold Constraints: None
- Maximum Iterations: 5000
- Stopping Threshold: 0.0010
- Rescale: Off
- Keep History: Off/on
Check out the following sites for the original sources for these tips:
http://www.tokeru.com/t/bin/view/Maya/MayaModelling
http://arcan3artist.blogspot.co.uk/2008/02/well-maya.html
Friday, 20 April 2012
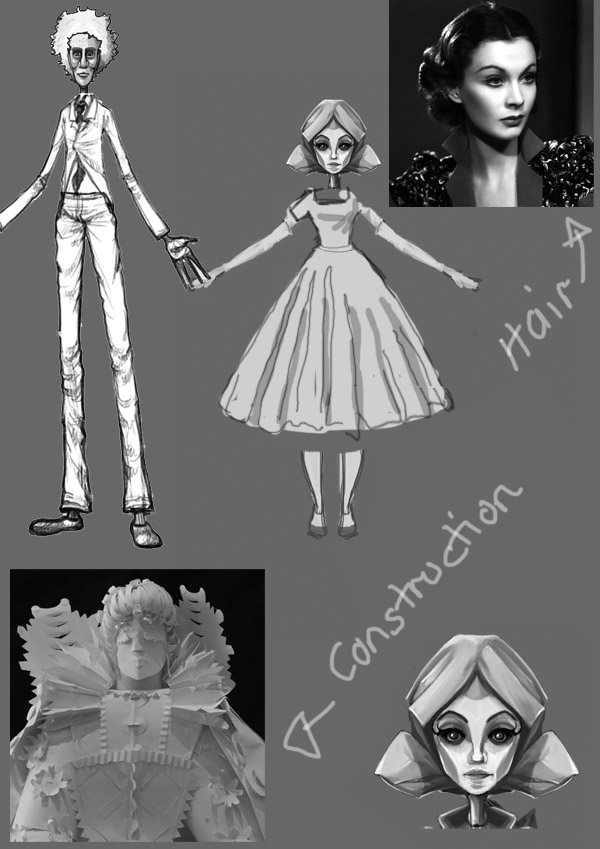
Character Designs: Margarita
The love interest in my story is a woman called Margarita who is made from paper.
Once again Weerawat Mungkung helped me with the character designs.
Below are some of the references that I sent to him and his character sketches showing how we got to the final design. (Latest at the top.)


Once again Weerawat Mungkung helped me with the character designs.
Below are some of the references that I sent to him and his character sketches showing how we got to the final design. (Latest at the top.)


Friday, 13 April 2012

Friday, 6 April 2012
Story: The Writer
My story has been through many iterations, but here's the final draft:
Once upon a time there was a
man made from wood, who had pencils for fingers.
He was born to write, but he
was suffering from writers’ block. All day he struggled to put words down on
paper but to no avail. The only thing that kept him going was the sight of the
beautiful woman who lived in the apartment across the street. Although he’d
never spoken to her, the writer had fallen deeply in love.
We join the writer as he sits in his garret room, flexing his
pencil-fingers and preparing to write on the blank sheets in front of him. Unfortunately
the words don’t come.
The writer scratches his head, furrows his brow, and drums his fingers
on the table, but no inspiration strikes.
Over the course of the day the waste paper basket begins to fill with
balled sheets of paper as the writer discards his failed attempts.
Then, as night falls, a figure appears in the window opposite his apartment.
It is Margarita, the beautiful woman who lives next door and just happens to be
made entirely from paper.
The writer sighs and rests his chin on his hand: he watches as she
takes out a book and begins to read.
And, at last, inspiration strikes. The writer begins to write fluently,
the words flowing from his fingers over sheets and sheets of paper until
eventually he falls asleep, his head resting on the pages that he has written.
We fade through to the same scene a number of hours later as the
morning light from the sun creeps across the table to fall on the writers face.
He wakes up and as he catches sight of the paper strewn around him he
remembers with delight what happened the previous evening.
The Writer goes to the window to breathe in the morning air and as he
does so he sees something that gives him an idea. The two apartments have a
washing line strung between them and in a moment of inspiration he pegs the
pages, detailing his love for Margarita, to the washing line and sends them
across the gap.
Back in his room the Writer feels very pleased with his ingenuity but
then he catches sight of the waste paper bin, full to brimming with his
discarded attempts from the previous day, and suddenly his confidence plummets
and he immediately regrets what he’s done.
He hurries to the window to retrieve the pages but it’s too late – he’s
just in time to see Margarita lifting the final sheet from the washing line.
With events now beyond his control the Writer paces his apartment
anxiously, torn between hope and despair. Then something outside the window
catches his eye: once again there is something hanging on the washing line.
He pulls the line towards him and his face lights up as he realises
what it is. Margarita has folded one of his pages into the shape of a heart and
sent it back to him. She has, quite literally given him her heart. Then down
below a door opens and there is Margarita herself smiling up at him.
The Writer exuberantly flings the paper heart into the air and the
camera follows as it flutters into the air, tracing delicate arcs as it glides
down between the buildings. And when we reach street level we realize that the
Writer has got there before us and now, at last, holds Margarita in his arms.
Monday, 2 April 2012
AfterEffects: Scale Multiple Keys
I liked the relative timing of a number of actions that I'd set up in aftereffects, but I wanted to speed the whole sequence up - here's how:
Expand or contract a group of keyframes in layer bar mode
- Select at least three keyframes.
- Hold down Alt (Windows) or Option (Mac OS) and drag the first or last selected keyframe to the desired time.
Z-Brush: Use Posable Symmetry
Sometimes the mirror x tool in z-brush seems to go off centre: I've not quite got to the bottom of why this happens but here's my work-around:
Transform->Use Posable Symmetry
Transform->Use Posable Symmetry
Maya Tip - fixing offset centre of interest when tumbling persp camera
Just hit a frustrating problem in Maya, in persp view I hit 'f' to centre on an object but then when I rotate the camera the centre of interest is off, and I quickly lose the object that I'm trying to work on.
Fortunately the excellent polycount forum gave me a fix for this and here it is:
And here's the link to the thread: http://www.polycount.com/forum/showthread.php?t=53329
Fortunately the excellent polycount forum gave me a fix for this and here it is:
"I run into this occasionally if you hold ctrl and alt to marquis/box
zoom then hit f to focus again the rotation point will be properly
centered again.
(up and left is zoom out, down and right is zoom in)
I'm not sure exactly why this is but I think it has something to do with the camera object having a scale, as when I've looked in other views the camera object thing changes size when band zooming but not when using the scroll wheel or both mouse buttons, as these actually move the camera closer to the focus point."
And here's the link to the thread: http://www.polycount.com/forum/showthread.php?t=53329
Saturday, 24 March 2012
Environments: Street Sketch
The very talented Sarah Dargie has done a sketch of a street for me as reference for my modelling - thanks Sarah!


Thursday, 22 March 2012
Modelling: final Writer model
Here are some images of the final zbrush sculpt for the Writer character:


Monday, 19 March 2012
Yet more hair modelling
I've been neglecting the finishing touches on my Writer model - so here, finally, I've got round to completing his hair.


Wednesday, 14 March 2012
Environment: Street Reference
The architecture in my story is meant to be based on Edinburgh's Old Town so I grabbed a few photos for reference:


Subscribe to:
Posts (Atom)